• Our booking engine at tickets.railforums.co.uk (powered by TrainSplit) helps support the running of the forum with every ticket purchase! Find out more and ask any questions/give us feedback in this thread!

On the Workbench...

4COR

Member
Joined
30 Jan 2019
Messages
461
The "Do you have any model railway project" thread (https://www.railforums.co.uk/threads/do-you-have-any-model-railway-projects-on-the-go.202608/) from COVID lockdowns seems to have fallen by the wayside, and this is a little more specific, so I'll kick this off! Hope to keep adding as we go - would be interested in seeing anyone else's work!

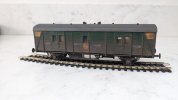
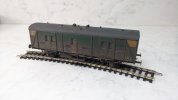
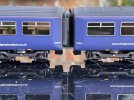
I started a month or so back my first ever Parkside Dundas model - I'd been toying with this for a while and picked an old few up cheap. Christmas brought some Railmatch paint, and I'm finally getting to the point of it looking like it should. First model is a BR(S) built plywood walled CCT (Parkside PC47, OO gauge).

I've finished it in BR Crimson (Railmatch), and used the excellent (but fiddly!) Cambridge Custom Transfers for it. N gauge model builders: you have my respect...

PXL_20240102_234323503.jpg

PXL_20240102_234202789.jpg

(Images show a Parkside Dundas PC47 CCT model in BR Crimson)

Frame and underside are Humbrol 173, with ends in Tamiya Black. There's a bit of weathering with a chocolate acrylic, but I now need to pluck up the courage to start washing it with dirt, and airbrushing the sides and roof. Need to decide just how filthy I'm going to aim with this - most were so disgusting you could barely tell if they were crimson, green or blue underneath...

I also need to add couplings, but need some NEM pockets and the height gauge to do that... (And it needs a little extra weight and I also need to decide about the window bars before finally fixing the roof on...

Next is a SR built BY Utility (PC34) - may go BR(S) green for that.
 
Last edited:
Sponsor Post - registered members do not see these adverts; click here to register, or click here to log in
R

RailUK Forums

4COR

Member
Joined
30 Jan 2019
Messages
461
Have got round to firing up the airbrush to do a bit of weathering - I went for something reasonably filthy, but not quite all over brown... - you can still tell that it is crimson, and just about read the van's number/XP markings etc, but it's very much toned down compared to the above "works condition".

I started with highlighting the door seams and the external irons with a dark wash. Sides and frames were airbrushed with Railmatch Frame Dirt. The roof uses Railmatch Roof Dirt - you can just about pick out some darker features on the roof that I brushed and sprayed in beforehand. Rather annoyingly, it looks like one of the (cosmetic) coupling hooks has dropped off - I'll have to see if I can find/make up a spare...


PXL_20240112_100830165.jpg PXL_20240112_101238480.jpg

I've also made a start on a BY Utility vehicle ("Van C") - it's gone together fairly nicely again, though a bit of fettling might be needed to get the roof to sit nicely. Sprayed up in Southern Region green - next job is to put the solebars etc on. They have been painted on the sprue with Humbrol 173 again.

PXL_20240112_102938060.jpg
 

Iskra

Established Member
Joined
11 Jun 2014
Messages
7,982
Location
West Riding
Have got round to firing up the airbrush to do a bit of weathering - I went for something reasonably filthy, but not quite all over brown... - you can still tell that it is crimson, and just about read the van's number/XP markings etc, but it's very much toned down compared to the above "works condition".

I started with highlighting the door seams and the external irons with a dark wash. Sides and frames were airbrushed with Railmatch Frame Dirt. The roof uses Railmatch Roof Dirt - you can just about pick out some darker features on the roof that I brushed and sprayed in beforehand. Rather annoyingly, it looks like one of the (cosmetic) coupling hooks has dropped off - I'll have to see if I can find/make up a spare...


View attachment 150117 View attachment 150118

I've also made a start on a BY Utility vehicle ("Van C") - it's gone together fairly nicely again, though a bit of fettling might be needed to get the roof to sit nicely. Sprayed up in Southern Region green - next job is to put the solebars etc on. They have been painted on the sprue with Humbrol 173 again.

View attachment 150119
Stunning work! And thanks for the explanation too :)
 

4COR

Member
Joined
30 Jan 2019
Messages
461
Thanks! I'm very much learning (I used to do a lot of Airfix type kits when younger but rail not really so much), but there's thankfully a great wealth of resources online (YouTube etc) which give a lot of ideas/methods to try out - I find airbrushing not too bad and it gives a good finish, but my brush work isn't quite as good and I need to have a bit of a practice with using powders for things like rust and so on.

Always things to improve on... (eg the wash I made with acrylics I found stuck to the brush somewhat leaving "streaks", but the dirt covered the majority up!)
 
Last edited:

D1511

Member
Joined
29 Jul 2023
Messages
306
Location
Edinburgh
Excellent thread, and thanks for posting your work....those CCTs look ace! We are all our own fiercest critics, and I think the CCTs look excellent, and I particularly like the streaks!
I'm a fan of pigments and powders for rust effects, but I've recently got hold of some Mig Ammo U Rust stuff, so perhaps I'll post some of my experimentation with those on here, if that's OK?
Anyway, looking forward to seeing the green one weathered up soon!
On the subject of decals, I have recently started applying N gauge Scottish coal markings to my rake of HAAs, and the saltire flags are about 2.5mm x 2mm, so I know your pain! :D I can only do two or three before frustration kicks in and I have to do something much less fiddly!
 
Last edited:

4COR

Member
Joined
30 Jan 2019
Messages
461
Excellent thread, and thanks for posting your work....those CCTs look ace! We are all our own fiercest critics, and I think the CCTs look excellent, and I particularly like the streaks!
I'm a fan of pigments and powders for rust effects, but I've recently got hold of some Mig Ammo U Rust stuff, so perhaps I'll post some of my experimentation with those on here, if that's OK?
Oooh yes please - would be great to see how you get on and how you work with the powders :)
Anyway, looking forward to seeing the green one weathered up soon!
May not go for _quite_ such a strong effect on this one, but I do have a few kits to work through so maybe will go very heavy on one (I just need to work out how not to completely obliterate the decals...)
On the subject of decals, I have recently started applying N gauge Scottish coal markings to my rake of HAAs, and the saltire flags are about 2.5mm x 2mm, so I know your pain! :D I can only do two or three before frustration kicks in and I have to do something much less fiddly!
You have my respect! :lol:
 

4COR

Member
Joined
30 Jan 2019
Messages
461
Today I'm doing a bit of spraying up on the Van C I've been working on. Going to start weathering first with windows masked up, and the areas where the decals will go masked up - I want to make it look as if the markings have been wiped clean at some point - if it doesn't work out, then I can just weather back over the top later :lol:

(Yellow guards door and panels as it has a stove this one...)

PXL_20240127_121226112.jpg


(Image of the Parkside PC34 masked ready for spraying)

Lots of airbrushing happened today, and this evening I went through a phase of taking some of that weathering back (v heavy!) with a little T Cut and cotton buds, which has given some nice effects!

I still have the areas I masked out for the transfers - going to gloss those to get a good finish, so the odd area of BR(S) green and the area on the guard's door will eventually get appropriate text, and transferred over.


PXL_20240128_014621937.jpg

It is filthy! I made it look a little less so such there was a bit of a hint of BR(S) green, but still pretty yuk in terms of livery! The stove markings are very much toned down!
 
Last edited:

D1511

Member
Joined
29 Jul 2023
Messages
306
Location
Edinburgh
That looks excellent! It's a very nice model too. Scottish quality :D The wiped clean bits look really convincing! And nice gradation on the dirt top to bottom. Great job! Are you going to try some chalked destinations yourself, or are you going with decals?
 

4COR

Member
Joined
30 Jan 2019
Messages
461
It's gonna be decals for the numbering (it looks a bit odd where I had the Maskol in place, but I'll try and blend it back in once the decals are in place (the odd one on the centre panel needs "GUARD" adding!) . Chalk destinations - perhaps - I hadn't really thought about that, and don't currently have any decals to do it!

Windows need sorting out - the Maskol proved tricky to work with, and hard to remove properly. Again, blending in might be the answer.
 

D1511

Member
Joined
29 Jul 2023
Messages
306
Location
Edinburgh
Maskol or equivalent can be fiddly to remove from recesses, but have you tried poking some blue tac on the tricky bits with a cocktail stick, and then dabbing it off with a bigger blob of blue tac? It picks up the mask quite well. I use the Ammo masking fluid, and blue tac removes it nicely.
Railtec transfers do a sheet of chalked parcels destinations if you want to add those!
 

4COR

Member
Joined
30 Jan 2019
Messages
461
Well, I think this is mostly there - it took a while to finish off (couplings/ballast/ roof gluing to follow later when I have a few to do...).

Bit of an issue with one decal that I have "covered" with filth!

I've started tinkering with renumbering/respraying an old Hornby Mk1 with a view to making a 3 Cor set - need to get to the library to have a look at Parkin for end details...
 

Attachments

  • PXL_20240209_112116980.jpg
    PXL_20240209_112116980.jpg
    1.4 MB · Views: 25
  • PXL_20240209_112156219.jpg
    PXL_20240209_112156219.jpg
    2.3 MB · Views: 24

4COR

Member
Joined
30 Jan 2019
Messages
461
Fiddling with a few bits this evening with a few bits. Have started a PMV which I primed the assembled roof and body of (it'll be BR crimson and an ex SR version).

Also continued an oil depot kit I've had floating around for ages - almost there....

And, I have some Hornby Mk1s that I'm going to renumber and turn into set 544 (I think - not decided). I've resprayed the sides, and this evening started to take off the toilet filler pipes from one end - still need to take a look at Parkin for some info, but the Comet kit instructions for the Mk1 BSK are actually quite useful for reference. I need to work out at what point the steps/grabs were taken off, but I think I can get away with leaving them for the late 50s/early 60s years (and trimming the emergency gear from the brake end). Will need a spray and re-decalling etc.

PXL_20240223_234010187.jpg
PXL_20240223_233939250.jpg

PXL_20240223_234024873.jpg
 

4COR

Member
Joined
30 Jan 2019
Messages
461
Not managed to have a lot of chance lately. At least finished the Ratio oil tanks, and managed to get round to spraying some vans I've been doing the odd 5 minutes on here and there - thought batch spraying was just easier.... (2xPMV, 1xBY, 1xPython A, all in BR Crimson).

PXL_20240313_225659610.jpg

PXL_20240313_225156812.jpg

Now to work on the underframes and get them mechanically finished.
 

4COR

Member
Joined
30 Jan 2019
Messages
461
Have been plugging away at two of the vans I sprayed up - a PMV and a Python A. Solebars/wheels sorted. PMV underframe finished - Python needs brakes and rodding applying (I've since done the brakes, steps, etc).

Then some more paint touchup, interior painting, windows, then weathering/decals....

PXL_20240410_230116418.jpgPXL_20240410_230054924.jpg
 
Last edited:

fgwrich

Established Member
Joined
15 Apr 2009
Messages
9,300
Location
Between Edinburgh and Exeter
One of my long term projects finally nearing completion! Scud 1 in its First Great Western guise!

Yellow ploughs, correct destination, oh and a centre car chassis to complete before it’s finished but it’s coming along at last!
 

Attachments

  • IMG_0065.jpeg
    IMG_0065.jpeg
    2.5 MB · Views: 19
  • IMG_0063.jpeg
    2.8 MB · Views: 0
  • IMG_0060.jpeg
    IMG_0060.jpeg
    2.5 MB · Views: 19
  • IMG_0061.jpeg
    IMG_0061.jpeg
    2.2 MB · Views: 16
  • IMG_0062.jpeg
    IMG_0062.jpeg
    2.2 MB · Views: 19
  • IMG_0066.jpeg
    3.7 MB · Views: 1
  • IMG_0067.jpeg
    3.2 MB · Views: 1

4COR

Member
Joined
30 Jan 2019
Messages
461
One of my long term projects finally nearing completion! Scud 1 in its First Great Western guise!

Yellow ploughs, correct destination, oh and a centre car chassis to complete before it’s finished but it’s coming along at last!
That looks super - is it a bashed R-T-R model or are you making it from kit/scratch? Some nice work! EDIT: Ah - I see the Latest Acquisition post!
 

4COR

Member
Joined
30 Jan 2019
Messages
461
A little fiddling around with a Hornby Mk1 BSK I'm "improving" (this one will be S34940 as best as I can do with the source model - but a rake of 3 cost about £35 on ebay - £27 after a bit of reselling items not needed...so not so bad really). I think I largely have the ends sorted in terms of removing moulding that's wrong (adding back the piping for the toilets using brass rod has to wait until the end though). Ready to respray in black.

PXL_20240426_080746632.jpg PXL_20240426_080738559.jpg

My mind turned to adding steps onto the solebars, at which point I noticed the Emergency Lighting and Air Release "Star" are in the wrong places from the as released model (and right where a step should go...). More T-cutting away and more transfers needed (though they are on the HMRS sheet anyhow).

PXL_20240426_120332778.jpg
I also started to think about making the wheels the correct size (14mm instead of current 12mm) - they are plastic at the moment and will need replacing if I want pickups for lighting, etc. I think I need to maybe borrow a Bachmann Mk1 bogie and see what the ride height becomes - adding 14mm wheels might foul the chassis, and make the coupler too high.
 
Last edited:

Top